Manage Security
The Trial Interactive platform allows for two different approaches for defining security rights in the Trial Interactive site. Security can be set on a folder level or on a document level.
Folder Level Security
This allows to assign security for the individual folders in the Index of the room. This automatically applies the security to the documents when they are uploaded in the assigned security folders.
To assign Folder Level Security:
- Click Manage Security
 from the
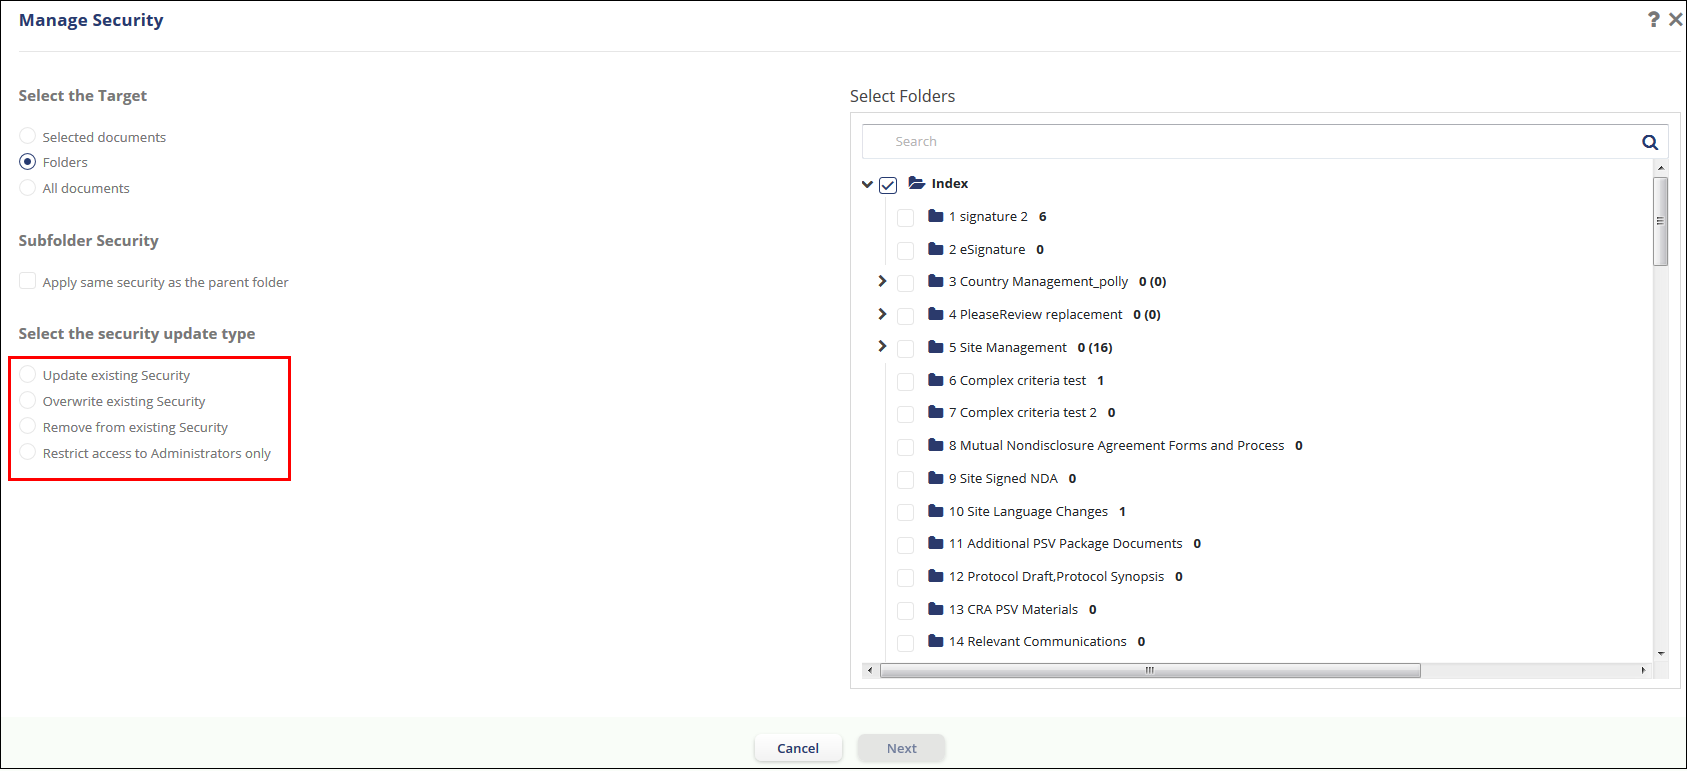
top ribbon bar. The Manage Security window opens. Refer to the screenshot
below:
- Select the Folders button from the Select a Target section in the left panel of the window. The panel on the right that displays the Index structure becomes active allowing you to select exactly to which folders you would like to apply the security change. You must select at least one folder from this list.By leaving the Apply same security as the parent folder checkbox unchecked, you can select specific subfolders on which to modify the security settings. If you check the box, you need only to select the main folders whose security settings you want to modify.
- Select the checkbox next to the folders to which the security is to be applied.
- Select the Security Update Type for the folder from the following
options.
Security Type Description Update existing security This option leaves all current security definitions in place and adds on any new definitions set in step two of the manage security process.
Over write security This option erases all current security definitions and replaces entirely with the definitions set in step two of the manage security process.
Remove from existing security This option leaves intact any security definitions already assigned, but removes access for any group(s) or user(s) specified in step two of the manage security process.
Restrict access to Administrators only This option erases all current security definitions in place and makes the target files/folders only viewable to administrators.
- Click Next. The Access and Security step of the Manage Security opens.
- Using the Groups and Users tabs on the left side of the control
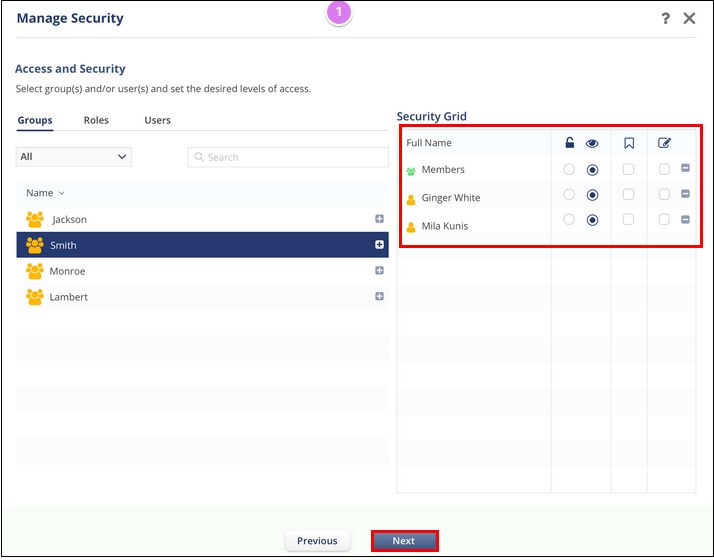
window, select the Groups and/or Users to update security rights.Refer to the
screenshot below:

- Hover the mouse over the group/user name in the left pane. The Plus icon appears to the right.
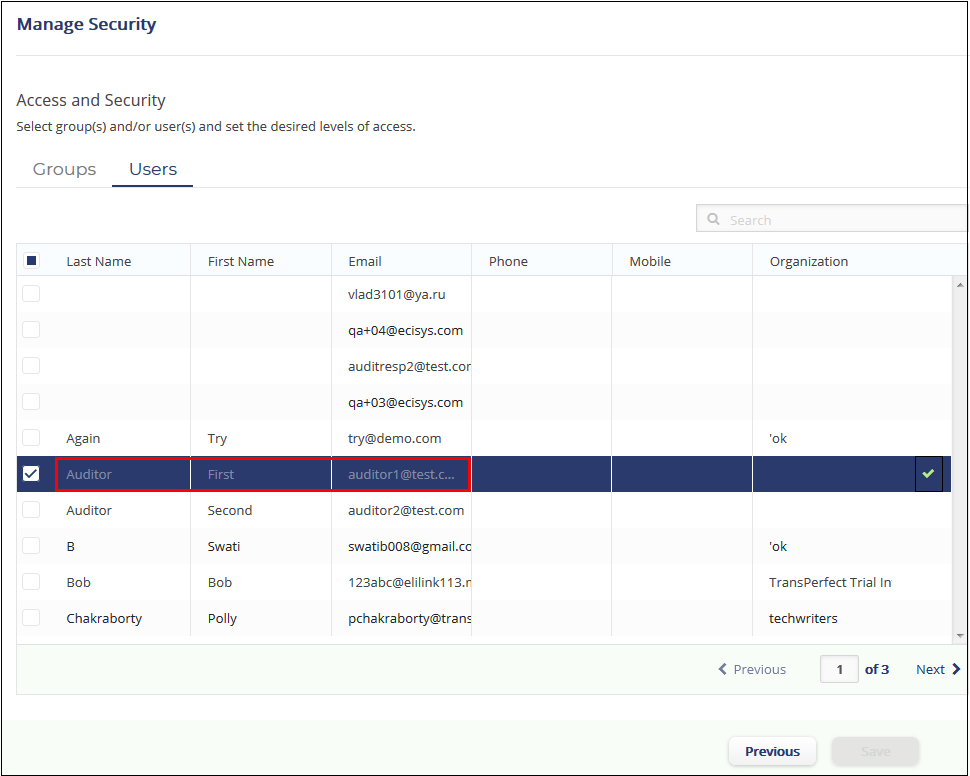
- Click the Plus icon to add the group and /or users to the Security Grid to
the right pane. Notice that the group and /or user is grayed out when you add
them to the Security Grid and a small green tick appears to the right of the
selected group/user. This moves the Groups and/or Users into the
Security grid on the right. Refer to the screenshot below:

- Select the required security definitions that you want to update for the selected
group/user.
Security Option Description Full Access Non Encrypted access allowing for full printing and saving rights View Only Allows users to only view the PDF while restricting printing and saving No Watermark If the watermark is in use in the site, this access will provide the users access to a non-watermarked version of the PDF file Redacted Gives the users access to the redacted version of the file while preventing access to the original (non-redacted) version - Click Save. This applies the security permissions on the folders for the
selected groups and/or users.Note: By selecting the target as All documents in the top left panel of the Manage Security tool, you need only to Select the security update type before clicking Next and selecting which groups or users to include in the security modification.
Document Level Security
- Open a folder that contains documents from the Index outline.
- Select one or more documents from the Document Grid whose security setting you want to modify.
- Click the Manage Security button located in the upper toolbar. The Manage Security tool opens.
- Click the button for Selected documents.
- Select the security update type by clicking one of the four options, as described in the previous section of this guide.
- Click Next. The second stage of the Manage Security tool populates the window.
- Using the Groups and Users tabs on the left side of the control window, select the Groups and/or Users to update security rights for by double clicking on the listings. This moves the Groups and/or Users into the Security grid on the right.
- Select which security definitions you want to update for the selected group/user, as described in the previous section of this guide.
- Click Save, and the security definitions are in place.
By Security View
The By Security view shows the list of all the documents based on the security provided to the folders. To view the folders by security:
- Click the three dots
 next to View by Index. The View Documents
By pop-up opens.
 - Select the By Security view.
- Click Select. The Index displays the documents and folders based on the security level.
By group
The By Group view shows the list of all the documents and folders belonging to a particular group. To view the folders by group:
- Click the three dots
 next to View by Index. The View Documents
By pop-up opens.
 - Select the By Group view.
- Click Select. The Index displays the documents and folders based on the security level.
