
Index Outline
The administrator can decide on several functions and appearances related to the Trial
Interactive room's index.
- Navigate to Main Navigation->Settings->Documents->Index Outline
- All documents imported are populated in the Upload folder. Refer to the
screenshot below:Note: A new Index sub-folder inherits the permissions from its parent folder.
- If a user emails documents to the room, such documents get stored in the
Inbox folder of the room. Note: Index Outline is a group of settings that Administrators should leave unchanged. The settings here are those chosen by the client during the initial room setup. Before making changes here, consult with the Project Manager and/or the Client Services Team.
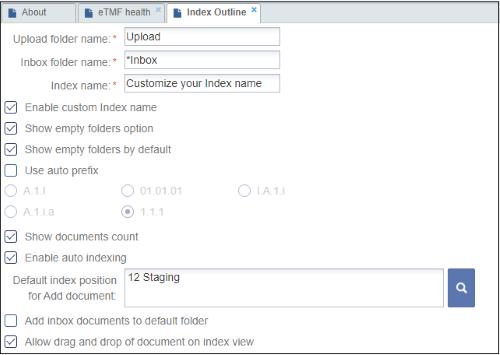
Auto Prefix
The folders in a room index are numbered, and the subfolders follow a standard
numbering system.
- These folder numbers are called as Folder Prefixes, whose settings can be decided from the Auto Prefix option.
- Activate or inactivate Auto Prefixing of folders in the room’s index by ticking the Use auto prefix checkbox. Refer to the screenshot above.
- If not selected, folder titles will appear in the index just as they were typed in during the creation of the room’s index.
- Auto prefixing inserts the client’s requested prefix of numbers or letters to identify the levels of the folders in the index.
- Click the radio button for the prefix pattern requested by the client.
Documents Count
Numbers in parentheses after the folder names indicate how many documents are
available to you in each folder.
- Click a folder to open the documents contained in it in the Documents Grid.
- Tick the Show documents count checkbox in the settings.
- Users in the room will see a number in brackets that indicate how many documents are in each index folder.
Changing the Index Name
If the client has requested some unique name for the room’s index besides the
standard ‘Index’, then you have to first enable the custom index name, and then type
the custom name in this field.
- If the client wants to customize the name of the Index, click the box to
activate it. The Index Name field then becomes active. Refer to the
screenshot below:

- Type in the custom name requested by the client.
- If this is the only change requested for this panel, click Save at the bottom of the panel.
Empty Folders Options
In this next section of this panel, you make selections for the client regarding the appearance of Empty Folders.
- You can enable or disable the Show Empty Folders Option.
- By showing that option, users in the room will see this checkbox at the bottom of the room’s folder index.
- Another option sometimes called for by the client is to show empty folders all the time.
- If that is the case with the room you’re configuring, click this box – Show Empty Folders by default.
- Then, the room’s full index will always show in the documents view, whether the folders are empty or not.
Hide index on add new document
Note: This setting is used only for non-admin users.
If this option is
enabled:
- Index position will be hidden in the new document window.
- But in case if auto-routing logic can't determine index position, this control will be displayed, so the user will be able to specify index position manually.
- A document cannot be copied or dragged to a different location/folder by editors.
Auto Indexing
In order to activate either of these next two options – Enable Auto Indexing
or Hide Index on add new document – this Default Index Position for Add
Document field must be completed.
- Click the magnifying glass. The full index list appears.
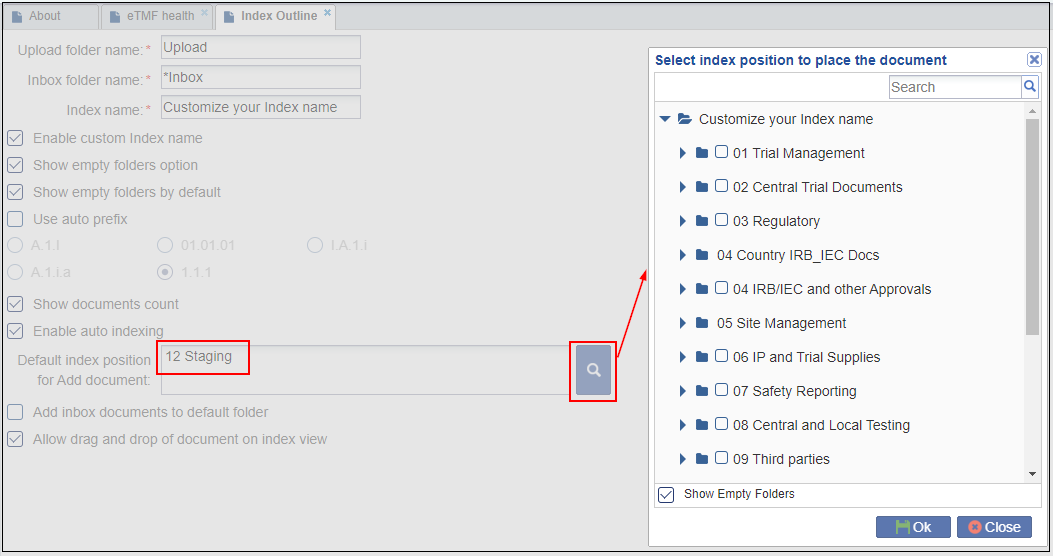
- Select the folder indicated by the client.
- Click OK. The window closes.
- Click Save at the bottom of the Index Outline panel.