
Performing Audits
If you are assigned the Auditor or Audit Manager action in your trial room, the audit feature is available to you when you click the Quality Review module in the toggling menu bar.
The Quality Review module has the following views:
- Audit: This allows you to perform audits
- Documents: This allows you to assign documents for audits
- Settings: This allows you to configure settings for Quality Review
Follow the steps below to perform audits:
- As a user with Auditor duties, log in to a room and click the Quality Reviewicon from the Main Navigation. The user can access Audits, Audit Documents, and Audit Settingsthrough the panel on the left.
- Click the Audit view from the left panel. The Audit view opens.
- Click three dots from the left pane. The Choose View By popup appears
as shown in the screenshot below:
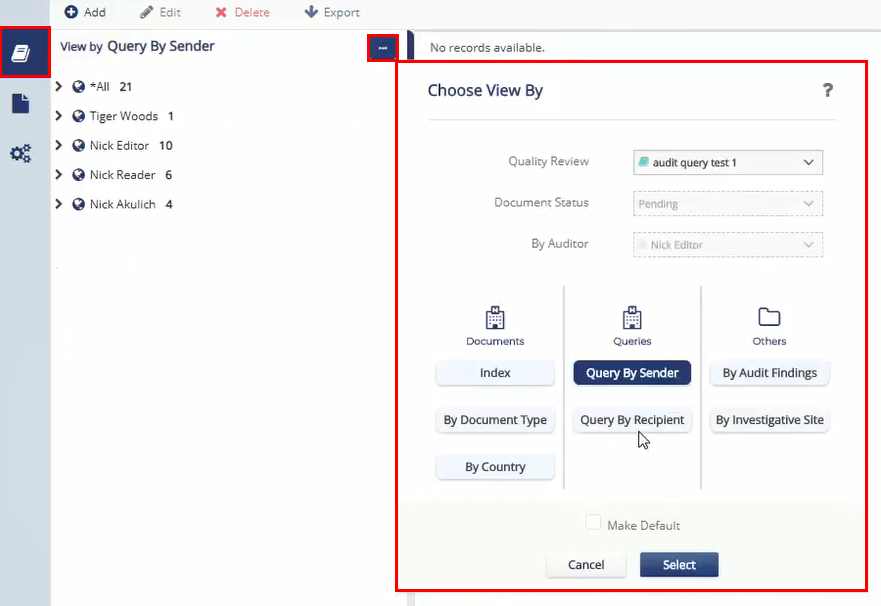
- Click the Quality Review dropdown to select an active audit from the list.
- The user can also choose to view the available audit documents By Document Type, By Country, and By Investigative Site, Audit Findings, Query By Sender, and Query By Recipient. Select views to be displayed.
- The corresponding folders display based on the selection made by the user. Drill
down and select the available folders.
Available documents will be displayed in the grid.
The Auditor has another means to filter the audit documents.
- Once the Audit is chosen, click the Document Status dropdown.
- Select Pending from the list.
- Select the auditor from the By Auditor dropdown.
- Click the Select button. Index folder containing documents Pending Audit populate in the Index View. Refer to the screenshot below:
- Open folders to locate documents published and assigned for audit.
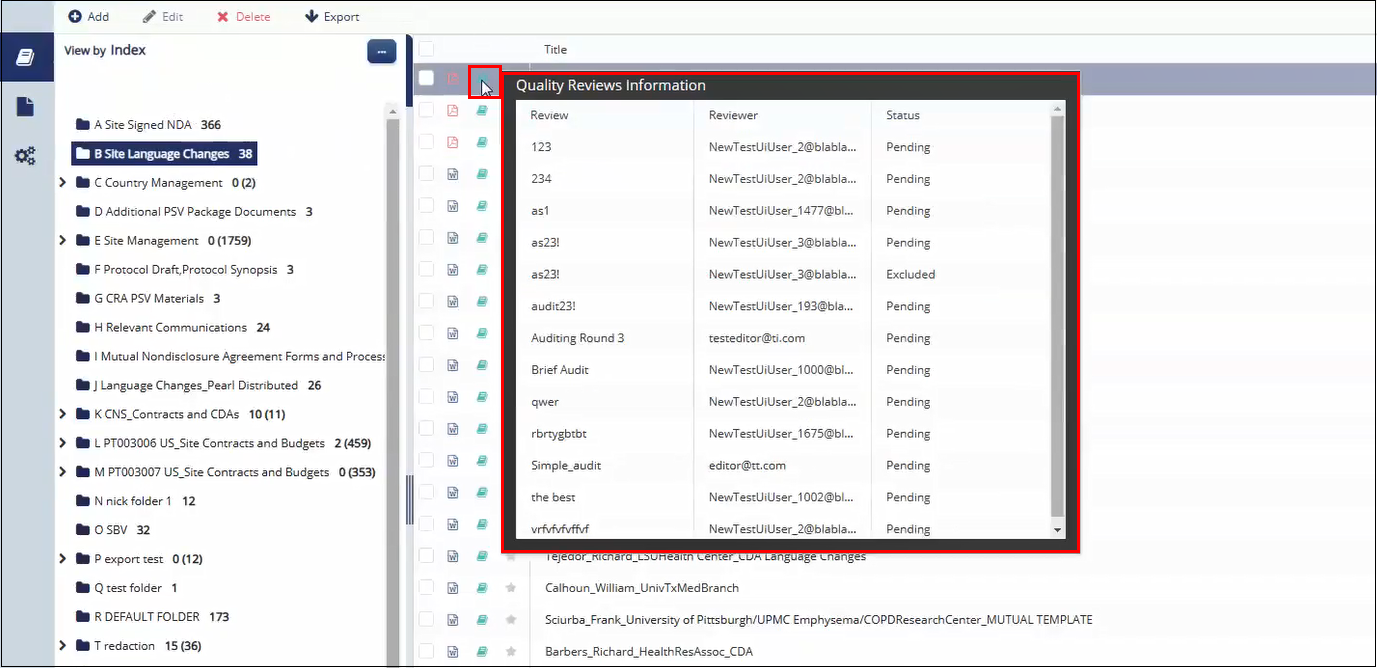
- Notice the Quality Review Information icon next to the document icon in the document grid.
- Click the icon to open the Audit Panel in the Metadata Panel. Also, notice that the
Quality Review Information popup displaying the audit status of the
selected document. Refer to the screenshot below:
- Open the document in the viewing panel.
- Examine the document and its metadata to determine if it meets the established audit criteria.
- From the Metadata panel to the right, click the dropdown arrow at the right
end of the Status field.
The status options appear.
- Click the appropriate Status. If the document contains Protected Health Information (PHI) and you want to delete and fail the document attachment for audit, tick the Contains PHI? checkbox.Note: To enable the Contains PHI? field, you will need to enable the feature when setting up the Audit under Document Audit Settings
On ticking this, the document automatically acquires a failed status and displays a warning regarding the removal of the attachment from the document.
Click Remove file to proceed. The system deletes the attachment in the backend and displays the Refresh icon next to the document in the grid.
On clicking the Refresh icon, the document disappears from the grid and moves to the Audited folder.
- Insert comments as appropriate.
- Click the Save button, or the Save and select next button in the lower
toolbar of the window. Note: Add a comment to all documents with which you find issue. Comments can also be added to documents that have passed your Audit Criteria
- To view audited documents, filter the documents by Audited from the panel on the left.
- The audited documents appear in the grid with their respective statuses. Documents failed due to the content of PHI appear in the grid without the attachment and acquire a failed status.