Documents Module
Auto Purge Settings
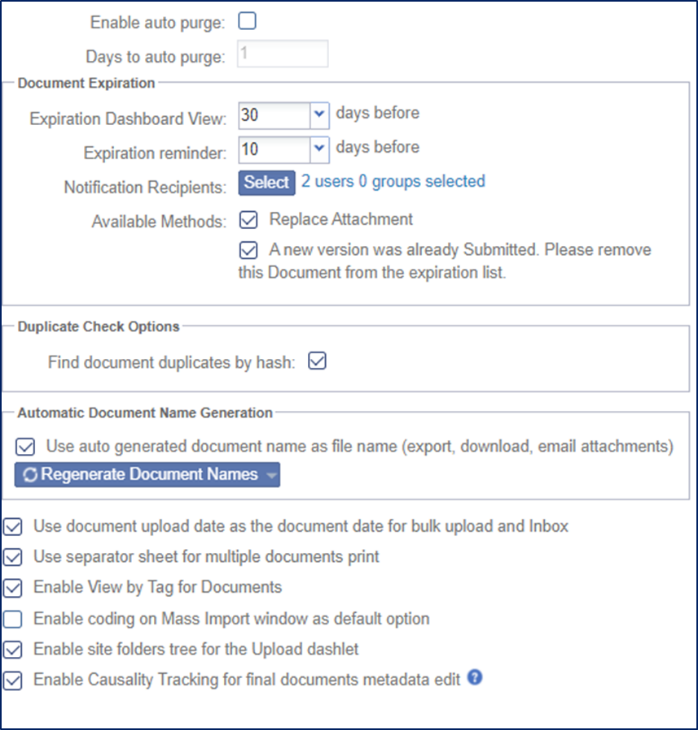
Trial Interactive can purge deleted documents when needed. This can be done manually from the Deleted Documents view in the Documents module or it can be set up as an automatic process. The instructions for setting up the Auto Purge are below.
- Navigate to Navigation Grid -> Settings -> Documents Module
- Click the checkbox next to Enable auto
purge.
 Figure 16: Documents Module
- Adjust Days to auto-purge by clicking the box and typing the number of days in the box below.
- Click the Save button.
Document Expiration Settings
Document types where an expiration date is applied may eventually expire before the conclusion of the study. In cases such as this, Trial Interactive has several tools available to users for the detection and replacement of expired or expired documents. The settings for these are discussed here.
- Navigate to Navigation Grid -> Settings -> Documents Module
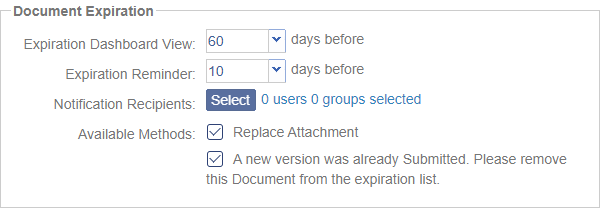
 Figure 1: Document Expiration
- The Expiration dashboard view field controls how much lead time users will have to see and act upon an expiring document before its actual expiration date.
- The Expiration reminder field controls when reminder emails should be sent regarding documents that will be expiring soon.
- Click Select from the Notification Recipients field to select users/groups who should receive a notification email.
- The Available Methods area allows
room administrators to choose which options are available to their
users in the Expiring Documents dashlet.
- Replace Attachment will allow users to replace the file attached to the existing metadata. All versions of the document will be visible in the ‘Versions’ tab of the metadata panel.
- The ‘A new version was already Submitted. Please remove this Document from the expiration list’ option indicates that another version of this document has been submitted to the room as a separate document and that the expiring document should be removed from the list of expired/expiring documents.
Duplicate Check Options
The methods that the room uses to detect duplicate documents are typically decided upon during room configuration but there is still one option remaining for room administrators which can be altered. Please note that the Service Desk has additional options and should be consulted when seeking to change duplicate detection requirements.
The ‘Find document duplicates by hash’ option allows the room administrator to enable or disable this particular duplicate check functionality. In short, a document hash is an alphanumeric representation of the qualities of a document.
 Figure 17: Duplicate Check Options
Automatic Document Name Generation
Room owners can choose to set the auto naming pattern for a document type and generate the document name automatically as per the set pattern. This is typically set up during the room configuration process and is not normally adjusted during the course of the study. Should you need to make any changes to automatic name generation settings, we recommend partnering with the Trial Interactive Service Desk.
Document Upload Date as Document Date
Note: Even though it is not advised to do so, an Administrator can change the naming and dating conventions used for documents that are bulk uploaded or delivered to the room through the Inbox.
- Enable the Use document upload date as the document date for
bulk upload and Inbox option by ticking the checkbox.
- Now, the upload date will automatically be assigned as the document date in the document profile.
Use Separator Sheet for Multiple Documents Print
This option impacts the “Print” function available in the Documents module. Users can choose to print multiple documents. What the system initially does is to create a .pdf file from all of the chosen files which can then be downloaded or printed locally. This option, when enabled, causes a separator sheet to appear between each of the source documents.
Enable View by Tag for Documents
This option, when enabled, provides room users with the option to view documents in the Documents module by the value in the Tag field. This metadata field may be enabled or disabled and may be assigned to certain documents or all documents just as with any metadata field. The View by Tag option here does not enable to metadata field for use, for that, please reach out to the Trial Interactive Service Desk or set up the field during room configuration.
The View by Tag metadata field allows users to apply tags (similar to the # applied to posts in social media) to documents. This would indicate that any documents with the same tag are related to the tag. One example might be tagging documents submitted in a certain language so that they could all be viewed together regardless of document type. One especially valuable element of this is that multiple tags can be applied to any document, meaning that documents can be cross-referenced by applying several tags.
Enable coding on Mass Import Window as Default Option
When users import documents, there is often a panel on the right-side of the import window which can be enabled or disabled depending on whether or not the user wishes to apply metadata to the documents being uploaded. This option would cause that panel to be activated by default when uploading documents.
Enable Site Folders Tree for the Upload Dashlet
This option, when enabled, allows users to see the site-related folders present in the Documents module and allows the user to choose which folder should house the documents being uploaded.
Enable Causality Tracking for Final Documents Metadata Edit
Administrators and Document Manager users can alter metadata for final documents in a study room. Enabling this option has two effects:
- The user, upon changing the metadata for a final document, will be requested to provide a reason for making the change.
- Mass Coding will be disabled in the study room.
