
Country Settings
Trial Interactive allows administrators to make changes to Countries Settings from this page.
Follow the steps below to make changes to the country settings:
- Navigate to the Navigation Grid -> Settings Module
- Go to the Countries settings from the left menu of the settings page.
Refer to the screenshot below:
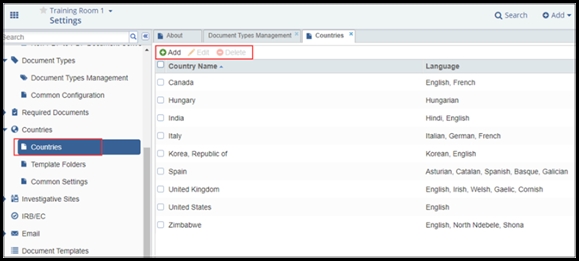
Selecting countries will open the option in a tab in the next pane. As shown in the screenshot above, the list of countries where studies are being conducted is displayed. These countries can be added, edited, or deleted from the buttons in the ribbon above the country listing.
Add Countries
Follow the steps below to add countries:
- Click Add from the ribbon above the country listing.
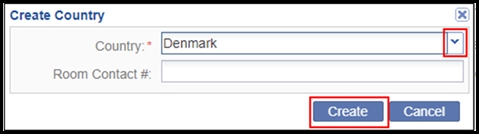
- The Create Country window will open. Refer to the screenshot below:
- The Create Country window will open. Refer to the screenshot below:
-
Click the dropdown arrow at the right end of the Country field. An alphabetized list of countries is populated to select from.
-
Select the name of the country to be added. The name of the selected country populates the Country field.
-
If there is a country-specific Study Contact #, include the associated number in the field.
- Click ‘Create.’ The name of the newly added country appears in the alphabetized list.
- Repeat these steps until you have added all of the countries associated with the study.
Edit Countries
Once a country has been added to the list, you can add or change the study contact #, and adjust access to groups or users.
Follow the steps below to edit countries:
- Select the required country from the grid to be edited. Click ‘Edit’ at the
top of the Countries window.
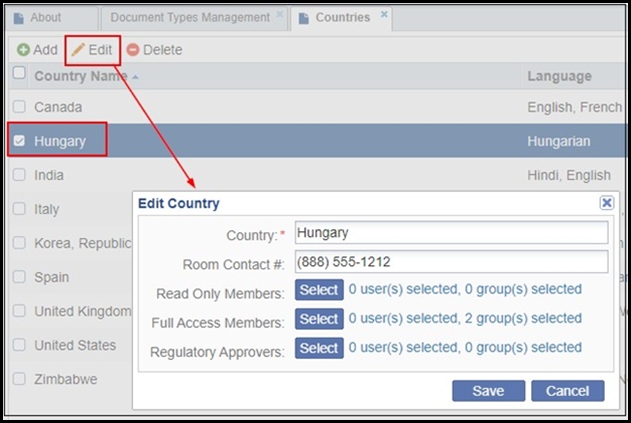
- The Edit Country window will open. Refer to the screenshot below:
-
Click the Study Contact# field to change the information.
-
Click Select next to any of the listed groups in order to add members.
-
Click Save.
Delete Countries
Follow the steps below to delete the countries:
- Select the country or countries that you need to delete from the list by clicking the checkbox next to the country’s name(s).
- Click Delete at the top of the Countries window. The country name(s) will be deleted automatically without giving you a warning.