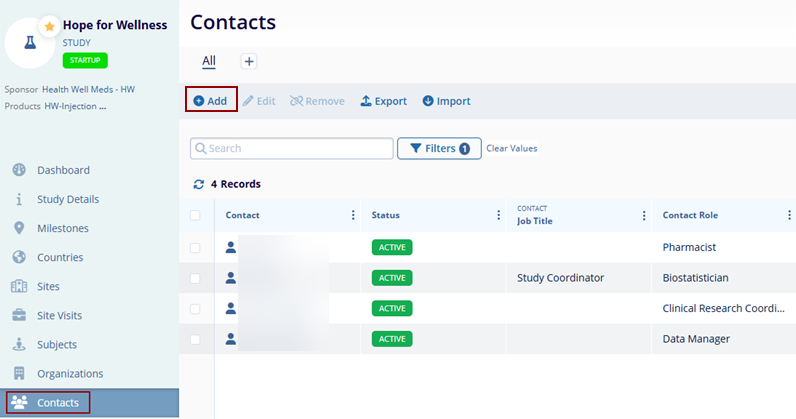
Study Contacts

  1. Click on the "Studies" link in the navigation menu on the left side of the screen. This opens the "Studies" window and displays the study list.

  2. Click on the name of the study to which you want to associate contacts. The dashboard for the study will be displayed.

  3. Click on the "Contacts" link in the navigation menu on the left side of the screen. This opens the "Contacts" window, displaying all contacts for the study.

  4. Click the "Add" button at the top-left of the screen.

  5. The "Create Contact in the Study" window will display.

  6. Enter the mandatory metadata to create a contact, Organization, First Name, Last Name, Contact Role, Email Address, and Status, as indicated by an asterisk (*) next to the field title. Enter any additional information as necessary.

    Note: When creating a contact record with at least one phone number, designate one number as the primary number.

  7. To learn how to create a contact, click here.

    Note: The search functionality can be used to search for addresses.

    s

  8. Before clicking "Create," verify that all fields are entered correctly in the "Create Contact in the Study" window.
  9. Click "Create" or "Create and Add Another" depending on whether you intend to create another contact immediately.

    Note: Contacts can only be created for organizations associated with the study.

  10. When editing a contact record from the list, only data that is contextual to the study can be updated.
  11. To edit a contact, select the contact and click the “Edit” button from the top menu. A quick view panel is displayed on the right side of the screen. Make any necessary changes in the quick view panel. Click "Save" at the bottom of the quick view panel. Refer to the screenshot below.

  12. To remove the Contact that is associated with the study, Select the Contact. Click the ‘Remove’ button from the top main menu.

    s

  13. The user will receive the confirmation pop-up, To proceed further click on the ‘Remove’ button or click on ‘Cancel’ to discard it.

  14. To learn how to export the organization, click here.