
Creating a New Audit
In Trial Interactive, before creating an Audit Profile, it may be helpful to understand the various roles that are assigned to users as a part of creating the audit:
- Auditor: Users assigned to this role are responsible for reviewing documents and assigning them a status of passed or failed. Any level of user can be assigned to this role.
- Audit Manager: Users assigned to this role can see audit results, create an audit export, reassign documents to other auditors, release audit findings from review, and make changes to the audit profile. Only editors and higher-level users may be assigned to this role.
- Audit Responder: Users assigned to this role are responsible for taking action to rectify audit findings generated by the auditors during their review of the documents. Only editors and higher-level users can be assigned to this role.
The process for creating a new audit profile is discussed below:
- Prior to beginning this process, it is crucial that you ensure that all applicable Quality Review Statuses should have already been created.
- Navigate to the Quality Review Settings area of the Quality Review module.
- Press ‘Add’ button in the menu bar above the grid.
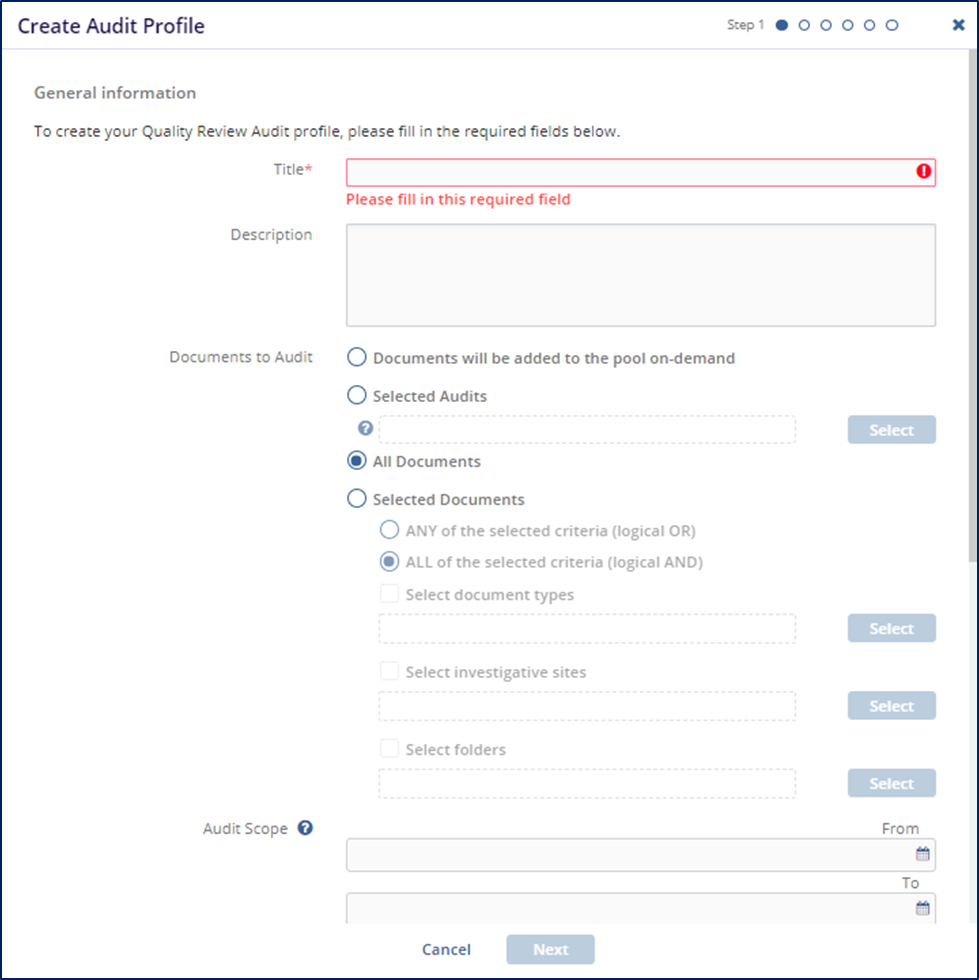
- This will open the Create Audit Profile window.
- This will open the Create Audit Profile window.
- Enter a title for the audit profile.
- It is generally best to be as specific as possible here. For example: 2nd Quarter 2021 Final Documents Review
- The description field is not required but it is highly recommended as it serves as a
mission statement of sorts for the audit and will assist in choosing the correct
audit settings in the remainder of the fields.
- For example: “This audit will review a random 20% of all documents that were published to the eTMF during the 2nd quarter of 2021.”
- The ‘Documents to Audit’ area has several options to choose from:
- Documents will be added to the pool on-demand: This option will create a blank audit with no documents in it. Editor, manager, and administrator users can then add documents to the audit manually via the Documents Cart.
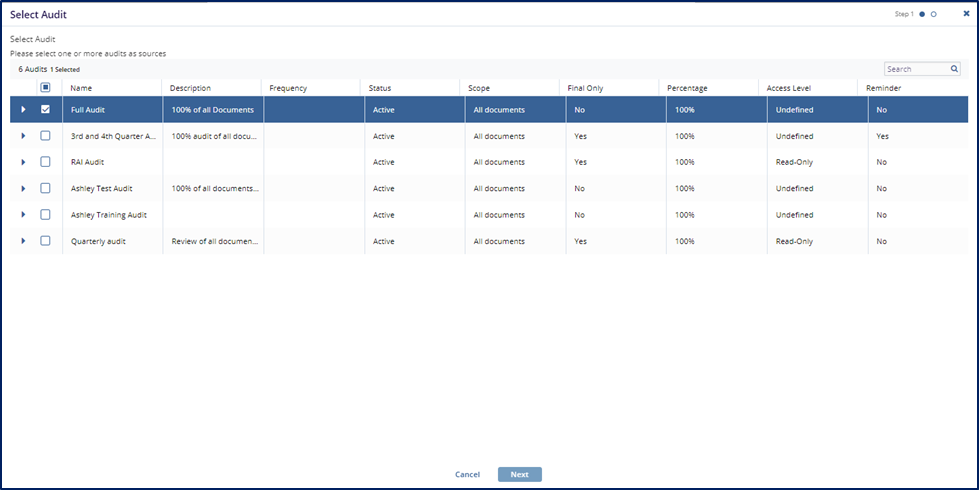
- Selected Audits: This option indicates that the audit will be
reviewing the work done in a prior audit or set of audits. If you select
this option, you will be asked to specify which audit and which auditor(s)
you wish to review.
- All Documents: This option will cause the system to gather all documents which meet the criteria chosen below.
- Selected Documents: This option allows the user to specify the
criteria which the room will use in gathering documents for review.
- The user will first need to specify whether the room should take in to account ANY or ALL of the criteria specified.
- The Audit Scope is only applicable to audits which are reviewing documents from a
specific timeframe.
- In the example from above (2nd Quarter 2021 Final Documents Review), the user would specify the beginning and end dates for the 2nd Quarter of 2021.
- The ‘Submitted’ and ‘Final’ radio buttons are asking the user to specify which date
should be used when determining whether or not the document falls into the Audit
Scope designated in step 6.
- Submitted: The date that the document was submitted to the room.
- Final: The date that the document was made ‘Final’ and published to the index.
- Indicate whether or not the system should include documents which were already included as a part of another audit.
- Indicate whether the system should include only documents which are in a ‘Final’
status.
- If this option is not checked, it is possible that a document may go through the QC Workflow and the Quality Review Audit at the same time. This may cause some confusion and is not recommended.
- Sometimes, when the Audit Responder is addressing an Audit Finding, a document’s
metadata may be updated. The ‘Add modified documents back into the audit pool’
option tells the system that, if any of the following metadata fields were updated
as a part of the correction, the document should be re-added to the audit for
another review.
- Index
- Category
- Document Type
- Investigative Site
- Document Date
- The ‘Percentage of new documents’ tells the system that, whenever it gathers documents matching the criteria above, it needs to take a random sampling matching the designated percentage.
- The ‘Update Interval/Frequency’ field is for use in ongoing audits which will need to be updated at regular intervals. The system will go out and gather new documents matching the specified criteria at the indicated interval.
- Indicate the auditor access level.
- View Only, no download: This restricts the auditor to viewing documents.
- Full Access: This allows the auditor to download or modify documents based on their user access level rights. This is most commonly applied to internal audits.
- Indicate whether the auditors should have access to the ‘Contains PHI’ function.
- This function allows an auditor who discovers PHI in the room to immediately delete the attached file. This will move the file record (metadata only) to the Audit Responder so that they can upload a redacted version of the document.
- There are two types of audit notification that can be sent. Indicate whether or not the room should send audit notifications.
- Press ‘Next’
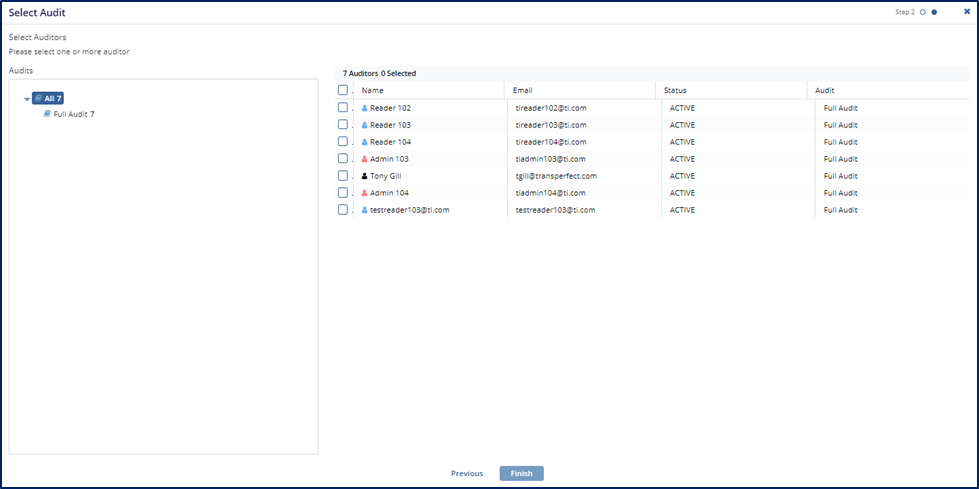
- The next step is to assign the users who will be Auditors in the audit.
- Press the ‘Add’ button.
- This will open the ‘Add Users and Groups’ window.
- Move any applicable users and/or groups to the right panel by clicking and dragging, double clicking, or by pressing the + sign that appears at the right side of the user’s line.
- If multiple auditors have been added, the ‘Configure Content’ option may be used. It
is optional.
- This option is most useful when you have chosen specific criteria such as document types or investigative sites and you would like a specific auditor to review a specific document type or all documents associated with a specific site.
- Select the auditor and press ‘Configure Content.’
- Choose which criteria will be used in assigning documents to this
auditor:
- Document Types
- Investigative Sites
- Folders
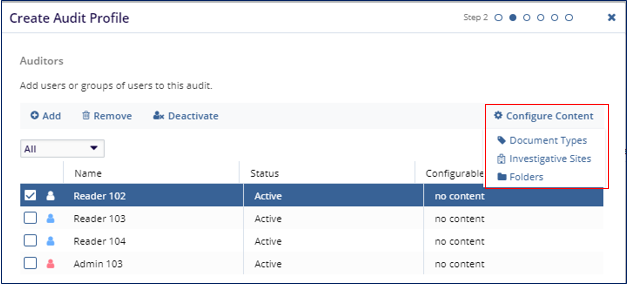
- Once selected, another window will open in which you will be able to specify which document types, sites, or folders apply to the specified user.
- When you are done adding auditors and, if necessary, configuring content, press ‘Next.’
- The next step is to assign the users who will be Audit Managers in the audit.
- Press the ‘Add’ button.
- This will open the ‘Add Users and Groups’ window.
- Move any applicable users and/or groups to the right panel by clicking and dragging, double clicking, or by pressing the + sign that appears at the right side of the user’s line.
- Press ‘Next’ when done.
- The next step is to assign the users who will be Audit Responders in the audit.
- These users cannot be the same as those who are added as Auditors.
- Press the ‘Add’ button.
- This will open the ‘Add Users and Groups’ window.
- Move any applicable users and/or groups to the right panel by clicking and dragging, double clicking, or by pressing the + sign that appears at the right side of the user’s line.
- Press ‘Next’ when done.
- In the next window, you will be required to choose the document statuses for use in
the audit.
- These must have been created prior to beginning the audit.
- You will be required to include at least one status for each of the basic 5
system statuses:
- Passed
- Failed
- Pending
- In Progress
- Excluded
- Press ‘Next’ when done.
- The final screen indicates if there are any errors detected.
- The most common of these would be if you had a user added as both an Auditor and an Audit Responder.
- If there are any errors, use the section link to go back and correct the
error.
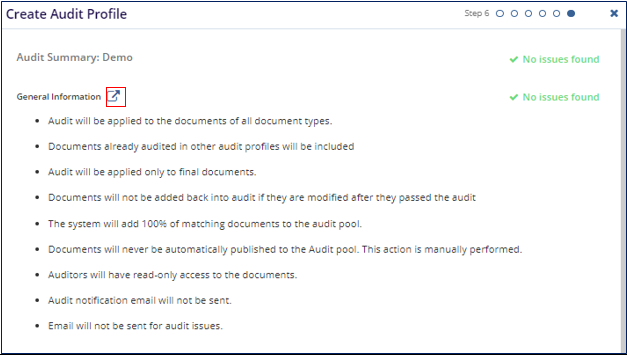
- When you are done, press ‘Finish.’
- A window will open asking you if you want to activate the audit.
- If you press ‘No’ the window will close and the audit will be added to the list in an ‘Inactive’ status.
- If you press ‘Yes’ the window will close and the audit will be added to the list in an ‘Active’ status.