Creating a Sponsor
To navigate to the Sponsor list, view all Global-level sponsors, and create a new sponsor, follow the steps below:
- From the left-hand navigation links, select Sponsors. The Sponsors screen opens where all sponsors at the global level are displayed.
- Click the +Add button from the menu bar above the grid to add a new sponsor.

- On the Create Sponsor screen, add the following fields into their respective
sections. Note: To create a sponsor, users must enter the mandatory fields Name, Type, and Status which are marked with an asterisk (*) next to the field title. Other fields are optional.
Step by Step All fields are explained below:
General Information
- Name*: Enter a name for the sponsor.
- Number: Enter the unique number for a sponsor.
- Parent Organization: To add an existing organization to the sponsor, click on the drop-down arrow and select the appropriate organization from the list. To create a new organization, click on the +Create button.
Note : To Create an organization, refer to Organizations section.

- Type: This field is pre-filled as Sponsor and is not editable.
- Subtype: Select the appropriate subtype from the drop-down menu.
- Status: By default, the user can see New Status. To add a different status, click on the drop-down arrow and select the status.
- Primary Contact: To add a contact to the sponsors, click on the drop-down arrow and select the appropriate Contact from the list. To create a new contact, click on the +Create button.
Note: To add a new contact, refer to the Creating a Contact section.
Phone Numbers
- Click on +Add to input phone numbers and enter the phone number in the provided field.
- Specify the phone number type i.e., Work, Mobile, Office, or Fax.
- Select the Country Code.
- Click on the Set as Primary checkbox.
- Click on the Delete icon to remove the phone number.

Emails
- Click on the +Add button and enter the email address in the provided field.
- Enter any additional notes regarding the Sponsor in the Notes field.
- Click on the Set as Primary checkbox.
- Click on the Delete icon to remove the email address.

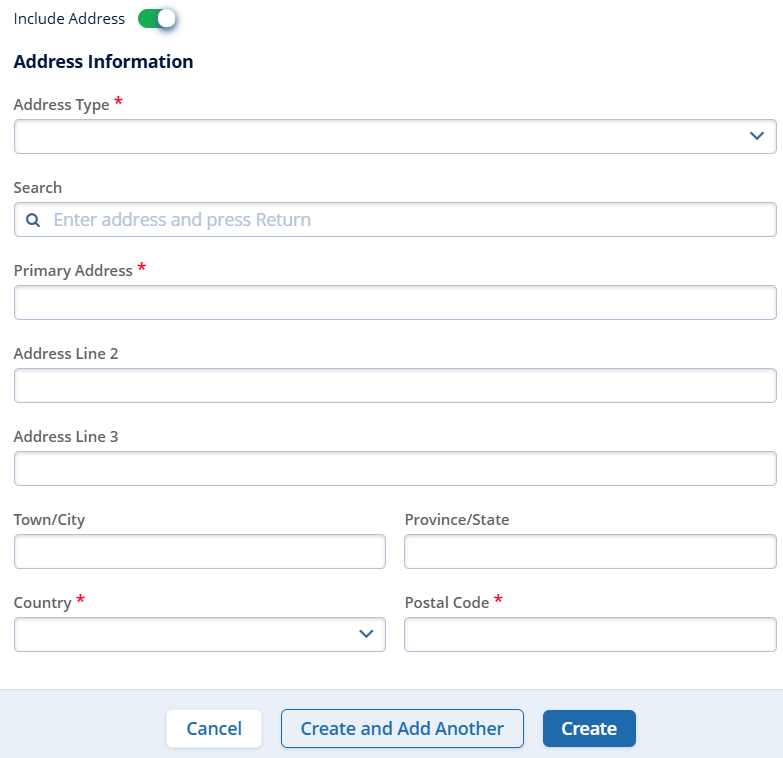
Include Address:
- Toggle the switch to include an address and enter the mandatory details into the respective fields.
- To include an address, enter the following mandatory fields highlighted with a red
asterisk (*) mark.
- Address Type
- Primary Address
- Country
-
Postal code
- Add details to the optional fields if required.
- Address Line 2
- Address Line 3
- Town/City
-
Province/State
- Additionally, enter the address in the search box to view an auto-populated list based on the search term.
- After filling in all required fields, select an option from the bottom of the form.
-
- Create: Saves the new organization and closes the screen
- Create and Add Another: Saves the new organization and opens a new screen to add another organization.
- Cancel: Discards the information and closes the screen.

-
- Click on the ‘Create’ button and it displays the success message.

